
Meade Model 4500 Reflecting Telescope Manual and Overview
Overview, specifications, setup, operation, and maintenance notes for the Meade Model 4500 4.5-inch reflecting telescope.
The Meade Model 4500 provides strong optical performance for observing the Moon, planets, and deep-sky objects. Its 114mm aperture, equatorial mount, and aluminum tripod make it a capable beginner-to-intermediate telescope for astronomical use.
The telescope includes a precision equatorial mount with manual slow-motion controls on both axes. The all-aluminum tripod provides a solid but lightweight observing platform.
Optional motor drive
#531 Electric Motor Drive: For fully automatic tracking of astronomical objects, the Meade #531 Motor Drive is available for attachment to equatorial telescope Models 285, 395, and 4500.
A note about magnification
When buying a telescope, one of the least important factors to focus on is magnification, or “power.” What matters more is aperture — the diameter of the telescope’s main lens or primary mirror.
A telescope’s magnification depends on the eyepiece being used. All Meade telescopes include one or more eyepieces as standard equipment, and optional eyepieces are available for higher or lower powers.
A common beginner mistake is to use more magnification than the telescope’s aperture and current atmospheric conditions can support. The result is often a fuzzy, dim, poorly resolved image. In practice, a smaller, brighter, sharper image is much better than a large but blurry one.
How to calculate power
Magnification is calculated by dividing the focal length of the telescope by the focal length of the eyepiece.
Formula:
Magnification = Telescope focal length ÷ Eyepiece focal length
For example, if a telescope has a focal length of 1000mm and uses a 25mm eyepiece:
1000 ÷ 25 = 40X
Choosing eyepieces
Depending on how you plan to use your telescope, you may want to add a few extra eyepieces or a Barlow lens.
For Meade Models 230, 285, 390, 395, and 4500:
- 25mm or 40mm eyepieces are well suited for wide star fields, nebulae, and terrestrial viewing.
- 4mm to 18mm eyepieces are better for the Moon and planets, though the highest powers should only be used under very steady atmospheric conditions.
- A 2x Barlow lens doubles the effective magnification of an eyepiece.
Automatic tracking with a motor drive
Meade equatorially mounted telescope Models 285, 395, and 4500 include manual slow-motion controls for tracking astronomical objects as they move across the sky.
Although stars and planets appear fixed to the naked eye, they are always in apparent motion because the Earth rotates once every 24 hours. Through a telescope, this movement becomes noticeable much more quickly, and objects can drift out of view in as little as 10 to 30 seconds.
The optional Meade #531 Electric Motor Drive provides automatic tracking. It uses an internal DC servo motor powered by three AA batteries and does not require external wires or cords.
Specifications: Meade Model 4500
| Specification | Value |
|---|---|
| Telescope | Model 4500 |
| Optical design | Newtonian Reflector |
| Diameter | 114mm (4.5”) |
| Focal length / focal ratio | 910mm / f/8 |
| Resolving power | 1.0 arc sec |
| Coatings | Multi-Coated |
| Near focus | 60 ft |
| Limiting visual magnitude | 12.4 |
| Maximum practical visual power | 325X |
| Optical tube dimensions | 5.5” x 33” |
| Mounting type | Equatorial |
| Slow-motion controls | RA and Dec |
| Viewfinder | 6 x 30mm |
| Tripod | Aluminum, adjustable |
| Automatic tracking motor drive available | Yes |
| Net telescope weight | 27 lbs |
| Shipping weight | 40 lbs |
Source: Meade Instruments Corporation manual
Introducing the Meade Model 4500
The Model 4500 is an easy-to-operate, high-performance 4.5-inch (114mm) reflecting telescope designed for astronomical observing. It includes a deluxe equatorial mount and aluminum tripod, allowing continuous motion adjustment for tracking celestial objects.
This telescope is optimized for astronomy and is not intended for terrestrial observing.
Figure 1: Parts identification
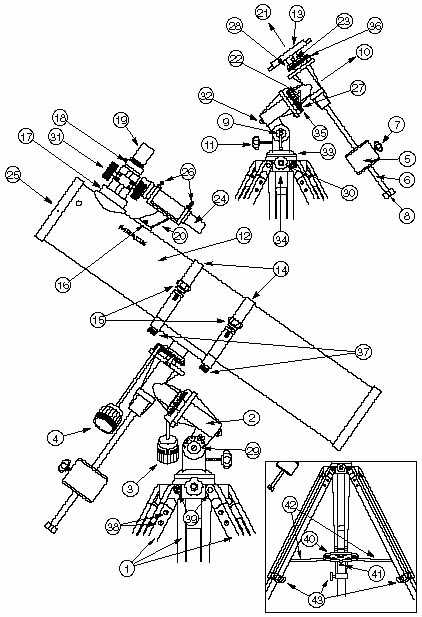
- Tripod legs
- Equatorial mount
- R.A. flexible cable control
- Dec. flexible cable control
- Counterweight
- Counterweight shaft
- Counterweight lock
- Safety washer / thumbscrew
- Latitude lock
- Polar axis
- Latitude adjustment knob
- Optical tube assembly
- Optical tube saddle plate
- Cradle rings
- Cradle ring lock knobs
- Viewfinder bracket mounting bolts
- Focuser
- Focuser thumbscrew
- Eyepiece
- Viewfinder bracket
- Declination axis
- R.A. lock
- Dec. lock
- 6 x 30 viewfinder
- Telescope front dust cover
- Viewfinder bracket thumbscrews
- R.A. setting circle
- Dec. setting circle
- Latitude dial
- Azimuth lock
- Focus knobs
- Polar shaft acorn cap nut
- Azimuth base
- Azimuth shaft bolt
- R.A. worm block assembly
- Dec. worm block assembly
- Cradle ring attachment knobs
- Tripod leg Phillips-head fastener screws
- Tripod-to-mount attachment points
- Accessory shelf
- Accessory shelf central mounting knob
- Tripod leg brace supports
- Tripod leg lock knobs
1. This manual
These instructions cover setup, operation, specifications, and optional accessories for the Meade Model 4500. Reading through the full guide before first use will help you get the best performance from the instrument.
2. Standard equipment
- Complete optical tube assembly with a 4.5-inch (114mm) primary mirror
- Viewfinder mounting bolts with mounting nuts
- 1.25-inch rack-and-pinion focuser
- Equatorial mount with pre-attached adjustable aluminum tripod and leg braces
Included accessories
- MA25mm (36X) eyepiece, 1.25-inch outer diameter
- Cradle rings with lock knobs
- 6 x 30 viewfinder and bracket
- Counterweight with counterweight shaft
- Flexible cable controls for both telescope axes
- Accessory shelf with mounting knob
Unpacking and assembly
The Meade Model 4500 arrives mostly pre-assembled. Inside the box you should find the optical tube assembly, the tripod with equatorial mount, and the accessories listed above.
References such as (6) refer to Figure 1 unless otherwise noted.
Assembly steps
- Remove and identify all standard equipment.
- Install the three tripod lock knobs into the threaded holes located near the bottom of each tripod leg. Tighten only until snug.
- Spread the tripod legs fully until the braces are taut.
- Adjust the tripod height by loosening the tripod lock knobs, extending the inner leg sections, and retightening the knobs.
- Attach the accessory shelf by removing the mounting knob, placing the shelf over the center brace hub, and reinstalling the knob.
- Attach the flexible cable controls and tighten the thumbscrews at the end of each cable.
- Slide the counterweight onto the counterweight shaft and attach the shaft to the declination axis. Move the counterweight to the midpoint and tighten its lock knob. Make sure the safety washer remains installed.
- Release the latitude lock and tilt the polar axis to roughly 45 degrees using the latitude adjustment knob. Tighten the latitude lock again.
- Open the cradle rings and position them over the optical tube assembly.
- Attach the viewfinder bracket to the mounting bolts near the focuser and tighten the mounting nuts.
- Center the viewfinder within the bracket rings using the thumbscrews.
- Place the optical tube onto the saddle plate and secure it with the cradle rings and attachment knobs.
- Insert the MA25mm eyepiece into the focuser and tighten the focuser thumbscrew.
At this point the telescope is fully assembled, but it still needs to be balanced and the viewfinder aligned before use.
Balancing the telescope
For smooth motion, the telescope must be balanced on both the polar axis and the declination axis.
To balance the right ascension axis
- Loosen the R.A. lock.
- Rotate the telescope until the counterweight shaft is horizontal.
- Slide the counterweight until the telescope remains balanced without drifting.
- Tighten the counterweight lock knob.
To balance the declination axis
- Lock the R.A. axis and unlock the declination axis.
- Loosen the cradle ring lock knobs.
- Slide the optical tube forward or backward in the cradle rings until it balances.
- Retighten the lock knobs.
Aligning the viewfinder
The 6 x 30mm viewfinder helps locate objects before viewing them through the main telescope.
To align it
- Remove the front dust covers from the telescope and viewfinder.
- Insert the MA25mm eyepiece into the focuser.
- Unlock the R.A. and Dec. axes and point the telescope at a distant land object, such as the top of a telephone pole.
- Re-lock the axes and center the object in the eyepiece using the flexible cable controls.
- Look through the viewfinder and adjust the thumbscrews until the crosshairs are centered on the same object.
- Refine the alignment on a bright star or the Moon if needed.
Understanding celestial movement
For a guide to celestial movement and coordinates, see:
Understanding Celestial Movements and Coordinates
Polar alignment
To align the telescope to the North Celestial Pole:
- Release the azimuth lock and rotate the mount so the polar axis points due north. Use a compass or Polaris as a reference. See this diagram.
- Level the tripod if needed by adjusting the leg heights.
- Set the latitude by loosening the latitude lock and adjusting the mount until the pointer matches your observing latitude.
- Retighten the latitude lock.

Once the latitude is set for your location, it usually does not need to be adjusted again unless you move to a different latitude.
Using the telescope
Once the telescope is assembled, balanced, and polar aligned, you are ready to observe.
General observing tips
- Loosen the R.A. and Dec. locks to aim the telescope, then retighten them once the object is centered.
- Start with a low-power eyepiece like the MA25mm.
- Focus using the focus knobs.
- Use the R.A. flexible cable control to track the object as it drifts through the field of view.
- Avoid touching the eyepiece while observing to reduce vibration.
- Allow your eyes time to adapt to the dark.
- Avoid observing through a window.
- Let the telescope reach outdoor temperature before serious observing.
- Avoid observing objects very low on the horizon.
Good beginner targets
- Jupiter’s cloud belts
- The four major moons of Jupiter
- Saturn and its rings
- The Moon, especially during crescent phases
- Bright nebulae, galaxies, double stars, and star clusters
Using setting circles
Setting circles help locate fainter celestial objects by their coordinates.
Basic procedure
- Use a star chart or atlas to find the R.A. and Dec. coordinates of a bright reference star near your target.
- Center that bright star in the telescope.
- Rotate the R.A. setting circle so it reads the correct right ascension for that star.
- Move the telescope until the setting circles match the target object’s coordinates.
The R.A. setting circle must be recalibrated each time the telescope is set up.
Calculating power for the Model 4500
The Model 4500 has a focal length of 910mm.
To find magnification:
Power = Telescope focal length ÷ Eyepiece focal length
Example using the included 25mm eyepiece:
910 ÷ 25 = 36X
Example eyepiece powers
| Eyepiece | Magnification |
|---|---|
| 40mm | 22.5X |
| 25mm | 36X |
| 12.5mm | 72X |
| 9mm | 101X |
| 6mm | 150X |
A 2x Barlow lens doubles the effective magnification of each eyepiece.
Practical magnification limits
Although the telescope is sometimes rated for very high magnification, the actual useful limit depends mostly on atmospheric steadiness. In many real conditions, magnifications between 75X and 175X will produce the best results.
Maintenance
1. Cleaning
Clean the optics as infrequently as possible. A small amount of dust has very little effect on performance.
When cleaning becomes necessary:
- Use a camel’s hair brush or compressed air to remove dust gently.
- Avoid touching mirror surfaces.
- Keep the telescope capped when not in use.
2. Mount and tripod adjustments
The mount and tripod are factory adjusted, but rough shipping may loosen some parts.
Tools that may be needed:
- 1/2-inch or 11/16-inch wrench
- 5/64-inch hex wrench
- Phillips-head screwdriver
Possible adjustments include:
- Tightening a loose polar shaft
- Tightening the azimuth base
- Reducing backlash in the R.A. and Dec. worm block assemblies
- Tightening tripod hardware
Do not overtighten, as this can affect smooth movement or damage threads.
3. Collimation
The optics are factory aligned, but rough handling may require collimation.
Correct collimation
Proper collimation ensures the sharpest possible images. This requires the primary and diagonal mirrors to be aligned so that all reflections appear centered when viewed through the focuser.
Helpful diagrams:


Spider vane adjustments
If the diagonal mirror is off-center, loosen the spider vane adjustment knobs and reposition the assembly until centered.
Diagonal holder adjustments
If the diagonal mirror is centered but the primary mirror is not fully visible in reflection, loosen the diagonal tilt screws slightly, rotate the holder, then retighten and fine-tune.
Primary mirror adjustments
If the primary reflection and diagonal are centered but your eye reflection is off-center, adjust the primary mirror tilt screws at the back of the tube.
Star testing
After collimation, test on a moderately bright star:
- Defocus the star slightly.
- A properly collimated telescope will show concentric rings with a centered dark shadow.
- If the pattern is uneven or elongated, adjust the primary mirror tilt and repeat.
Reference diagrams:


Quick specs summary
Primary mirror focal length: 910mm
Primary mirror diameter: 4.5” (114mm)
Focal ratio: f/8
Mounting: German equatorial